
DIY decor is no longer just about sticking masking tape on a wall. Since 2023, homemade decoration projects have shifted focus to reuse, customization of existing furniture, and creative repair. The Pinterest Predicts 2024 report notes a significant increase in searches related to visible embroidery and visible mending applied to interior textiles.
This trend changes the working logic: we start with an object already present in our home, not a shopping list from a craft store.
Read also : Essential Tips and Tricks to Enhance Your Natural Beauty
VOC emissions and supply choices for a healthy DIY decor project
An indoor decor project exposes you to pollutants that most tutorials overlook. The Anses, in its 2022 opinion on DIY and craft products, recommends favoring low-VOC paints, solvent-free glues, and water-based varnishes, especially in children’s rooms.
We still see too many projects shared online that use spray paints or neoprene glues without any mention of ventilation. In practice, a water-based varnish dries slightly more slowly than a traditional polyurethane varnish, but the final result is comparable for accent furniture or decorative objects that do not undergo intense abrasion.
See also : Investing in Real Estate: Tips to Optimize Your Wealth in 2024
The European REACH regulation also governs the pigments and dyes used in textile projects. Before dyeing cushions or painting upholstery fabric, check that the product has a compliance label. Plant-based dyes (onion skins, coffee grounds, turmeric) offer an alternative that produces less uniform shades, which fits well into a craft-style decor.
Several categories of DIY decor ideas lend themselves to solvent-free projects, which we regularly find on the Univers du Bricolage website alongside more detailed technical sheets on woodworking or wall painting.
Upcycling furniture: surface preparation techniques
Sanding a piece of furniture before repainting seems basic. The reality is more nuanced. The type of original finish dictates the entire course of the project. A piece of furniture varnished with polyurethane is not treated the same way as a waxed piece or a melamine piece.
On a varnished piece, medium-grit sanding is sufficient to create a mechanical grip. On melamine, sanding alone is not enough: a primer must be applied; otherwise, the paint will chip off within weeks. On a waxed piece, using a wax remover is mandatory, as the wax prevents any adhesion.
- Varnished furniture: sanding with 120-150 grit, dusting, then direct painting or undercoat depending on the wood’s porosity
- Melamine or laminate furniture: light sanding to dull the surface, application of a specific bonding primer, then painting
- Waxed furniture: application of a wax remover, sanding, then treatment identical to raw wood
- Metal furniture (chair legs, table frame): degreasing with acetone, rust-inhibiting primer if necessary, then painting
We recommend always conducting an adhesion test in a less visible area. Apply the paint, let it dry for the time indicated by the manufacturer, then scratch it with a nail or a coin. If the paint scratches easily, the preparation is insufficient.
Repair rather than conceal: visible mending in interior decoration
Visible mending, originally reserved for clothing, now applies to home textiles. A snag on a cushion or curtain becomes a decorative motif through a play of contrasting embroidery. The principle is simple: instead of mending invisibly, we use brightly colored thread and deliberately visible stitches.
This approach works particularly well on linen and thick cotton. Fine synthetic fabrics are more delicate to work with because the needle creates visible holes around the stitch. For a linen cushion, a scallop stitch or a chain stitch in pearl cotton provides a clean and durable finish.
Beyond textiles, the same logic applies to furniture. The kintsugi technique, borrowed from Japanese ceramics, involves repairing a broken object by highlighting the fracture line with a gold or copper-tinted putty. On a ceramic plate or vase, the repair becomes the central decorative element of the piece.
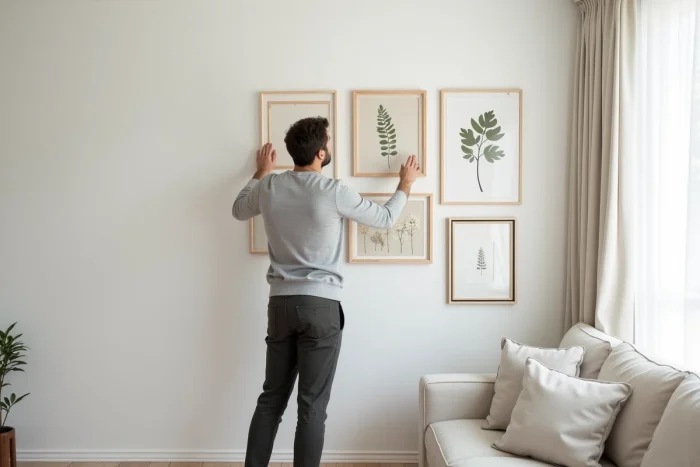
DIY wall decor without drilling: fixings and weight constraints
Non-drilling fixing solutions have multiplied, but their limits remain poorly understood. Adhesive strips like Command support varying weights depending on the surface: they hold well on smooth painted plaster, much less on a textured wall or wallpaper.
To hang a lightweight frame (less than one kilogram), adhesive strips are sufficient. Beyond that, we recommend fine nail hooks, which leave only a tiny hole and can support several kilograms. Picture rails, often seen as gallery accessories, are a permanent solution that allows for rearranging an entire wall without making new holes.
- Adhesive strips: suitable for lightweight frames, smooth surfaces, repositionable but for one-time use
- Fine nail hooks: a single point of impact, higher load capacity, easy removal with minimal filling
- Aluminum picture rails: initial installation with drilling, but complete freedom thereafter to move, add, or remove elements
The wall composition benefits from being planned on the floor before any fixing. Cut paper templates to the dimensions of your frames, attach them to the wall with masking tape, then adjust the spacing before placing anything permanent. This step takes ten minutes and avoids unnecessary series of holes.
One last often-overlooked point: low-angle light reveals every wall imperfection. If your wall has irregularities, a composition of frames or floating shelves masks them better than a uniform paint, which, on the contrary, accentuates them under side lighting.